Tuesday, 26 August 2014

Working with Sqoop

Apache Sqoop

Apache Sqoop(TM) is a tool designed for efficiently transferring bulk data between Apache Hadoop and structured datastores such as relational databases.

sqoop-1.4.4.bin__hadoop-1.0.0.tar.gz installation

$ tar -xvf sqoop-1.4.4.bin__hadoop-1.0.0.tar.gz

$ mv sqoop-1.4.4.bin__hadoop-1.0.0 sqoop144_h100

$ sudo gedit .bashrc

$ . .bashrc

Test sqoop installation with the command

$ sqoop144_h100/bin/sqoop help

Warning: /usr/lib/hbase does not exist! HBase imports will fail.
Please set $HBASE_HOME to the root of your HBase installation.
Warning: /usr/lib/hcatalog does not exist! HCatalog jobs will fail.
Please set $HCAT_HOME to the root of your HCatalog installation.
Warning: $HADOOP_HOME is deprecated.

usage: sqoop COMMAND [ARGS]

Available commands:
  codegen            Generate code to interact with database records
  create-hive-table  Import a table definition into Hive
  eval               Evaluate a SQL statement and display the results
  export             Export an HDFS directory to a database table
  help               List available commands
  import             Import a table from a database to HDFS
  import-all-tables  Import tables from a database to HDFS
  job                Work with saved jobs
  list-databases     List available databases on a server
  list-tables        List available tables in a database
  merge              Merge results of incremental imports
  metastore          Run a standalone Sqoop metastore
  version            Display version information

See 'sqoop help COMMAND' for information on a specific command.

hduser2@bala:~$


Monday, 18 August 2014

Working with Apache Hive on Ubuntu

tar -xvf apache-hive-0.13.1-bin.tar.gz

mv apache-hive-0.13.1-bin hive


editing .bashrc file

hduser2@bala:~$ sudo gedit .bashrc

creating warehouse folder in HDFS

hduser2@bala:~$ hadoop111/bin/hadoop fs -mkdir /home/hduser2/tmp/hive/warehouse

giving read write permissions to warehouse folder

hduser2@bala:~$ hadoop111/bin/hadoop fs -chmod g+w /home/hduser2/tmp/hive/warehouse

Adding hadoop path in hive config file

hduser2@bala:~$ sudo gedit hive0131/bin/hive-config.sh

# Allow alternate conf dir location.
HIVE_CONF_DIR="${HIVE_CONF_DIR:-$HIVE_HOME/conf}"

export HIVE_CONF_DIR=$HIVE_CONF_DIR
export HIVE_AUX_JARS_PATH=$HIVE_AUX_JARS_PATH
export HADOOP_HOME=/home/hduser2/hadoop111
# Default to use 256MB
export HADOOP_HEAPSIZE=${HADOOP_HEAPSIZE:-256}

Launch hive

hduser2@bala:~$hive
hduser2@bala:~$ hive

Logging initialized using configuration in jar:file:/home/hduser2/hive0131/lib/hive-common-0.13.1.jar!/hive-log4j.properties
hive> show tables;
OK
Time taken: 0.233 seconds
hive> exit;
hduser2@bala:~$


Hive Commands:

Creating table


Loading data

Inserting data into the data

dropping the table

listing the tables


Updating the table data

deleting the data from the table

UPDATE or DELETE a record isn't allowed in Hive, but INSERT INTO is acceptable.
A snippet from Hadoop: The Definitive Guide(3rd edition):
Updates, transactions, and indexes are mainstays of traditional databases. Yet, until recently, these features have not been considered a part of Hive's feature set. This is because Hive was built to operate over HDFS data using MapReduce, where full-table scans are the norm and a table update is achieved by transforming the data into a new table. For a data warehousing application that runs over large portions of the dataset, this works well.
Hive doesn't support updates (or deletes), but it does support INSERT INTO, so it is possible to add new rows to an existing table.


Apache Pig Installation on Ubuntu

cd /home/hduser2/

tar -xvf pig-0.13.0.tar.gz

mv pig-0.13.0 pig

Set the java home and pig install directory

hduser2@bala:~$ sudo gedit /etc/profile

export PIG_INSTALL=/home/hduser2/pig0130

export PATH=$PATH:$PIG_INSTALL/bin

export JAVA_HOME=/usr/lib/jvm/java-6-oracle

export PIG_CLASSPATH=/home/hduser2/hadoop111/conf/

hduser2@bala:~$ source /etc/profile

logout from ubuntu and login again

hduser2@bala:~$ pig
Warning: $HADOOP_HOME is deprecated.

14/08/26 07:40:47 INFO pig.ExecTypeProvider: Trying ExecType : LOCAL
14/08/26 07:40:47 INFO pig.ExecTypeProvider: Trying ExecType : MAPREDUCE
14/08/26 07:40:47 INFO pig.ExecTypeProvider: Picked MAPREDUCE as the ExecType
2014-08-26 07:40:47,060 [main] INFO  org.apache.pig.Main - Apache Pig version 0.13.0 (r1606446) compiled Jun 29 2014, 02:29:34
2014-08-26 07:40:47,061 [main] INFO  org.apache.pig.Main - Logging error messages to: /home/hduser2/pig_1409019047060.log
2014-08-26 07:40:47,083 [main] INFO  org.apache.pig.impl.util.Utils - Default bootup file /home/hduser2/.pigbootup not found
2014-08-26 07:40:47,205 [main] INFO  org.apache.pig.backend.hadoop.executionengine.HExecutionEngine - Connecting to hadoop file system at: hdfs://localhost:54310
2014-08-26 07:40:47,392 [main] INFO  org.apache.pig.backend.hadoop.executionengine.HExecutionEngine - Connecting to map-reduce job tracker at: localhost:54311
grunt>


Tuesday, 12 August 2014

errors while installing rstudio on Ubuntu 14.0.4


Install sudo apt-get install r-base and then launch rsudio from the bin folder

Error while installing xlsx package:

First install rJava which is a dependent for xlsx

sudo apt-get install r-cran-rjava

Error while loading xml package:

> install.packages("XML")
Installing package into ‘/home/bala/R/x86_64-pc-linux-gnu-library/3.0’
(as ‘lib’ is unspecified)
trying URL 'http://cran.rstudio.com/src/contrib/XML_3.98-1.1.tar.gz'
Content type 'application/x-gzip' length 1582216 bytes (1.5 Mb)
opened URL
==================================================
downloaded 1.5 Mb

* installing *source* package ‘XML’ ...
** package ‘XML’ successfully unpacked and MD5 sums checked
checking for gcc... gcc
checking for C compiler default output file name... 
rm: cannot remove 'a.out.dSYM': Is a directory
a.out
checking whether the C compiler works... yes
checking whether we are cross compiling... no
checking for suffix of executables... 
checking for suffix of object files... o
checking whether we are using the GNU C compiler... yes
checking whether gcc accepts -g... yes
checking for gcc option to accept ISO C89... none needed
checking how to run the C preprocessor... gcc -E
checking for sed... /bin/sed
checking for pkg-config... /usr/bin/pkg-config
checking for xml2-config... no
Cannot find xml2-config
ERROR: configuration failed for package ‘XML’
* removing ‘/home/bala/R/x86_64-pc-linux-gnu-library/3.0/XML’
Warning in install.packages :
  installation of package ‘XML’ had non-zero exit status

The downloaded source packages are in
 ‘/tmp/RtmpcGhePy/downloaded_packages’
>


Fix: Run the following command

sudo apt-get update

sudo apt-get install libxml2-dev
sudo apt-get install r-cran-xml

JVM not found while starting eclipse on Ubuntu 14.0.4


Add -vm argument to the eclipse.ini file


-startup
plugins/org.eclipse.equinox.launcher_1.3.0.v20140415-2008.jar
--launcher.library
plugins/org.eclipse.equinox.launcher.gtk.linux.x86_64_1.1.200.v20140603-1326
-product
org.eclipse.epp.package.jee.product
--launcher.defaultAction
openFile
-showsplash
org.eclipse.platform
--launcher.XXMaxPermSize
256m
--launcher.defaultAction
openFile
--launcher.appendVmargs
-vm
/usr/lib/jvm/java-6-oracle/jre/bin/java
-vmargs
-Dosgi.requiredJavaVersion=1.6
-XX:MaxPermSize=256m
-Xms40m
-Xmx512m

Monday, 21 January 2013

Apache Hadoop Installation on Ubuntu

As a pre requisite for Hadoop install jdk.


How to install Oracle 6 Jdk bin file on Ubuntu:

  • Download the 32bit or 64bit Linux "compressed binary file" - it has a ".bin" file extension
  • Give it permissions to execute and extract it
    chmod a+x jdk-6u45-linux-x64.bin
    ./jdk-6u45-linux-x64.bin
JDK 6 package is extracted into ./jdk-6u45-linux directory
Rename it:
mv jdk-6u45-linux java-6-oracle
  • Now move the JDK 6 directory to /usr/lib
sudo mkdir /usr/lib/jvm
sudo mv java-6-oracle /usr/lib/jvm

switch to Oracle JDK 6

webupd8.googlecode.com hosts a nice-easy script to help with this.
wget http://webupd8.googlecode.com/files/update-java-0.5b
chmod +x update-java-0.5b
sudo ./update-java-0.5b
don't worry - 0.5b refers to the script version - not the version of java!
On Ubuntu 14.0.4 version gksudo is not available by default so install it using the command:

sudo apt-get install gksu
enter image description here
Finally test the switch has been successful:
java -version
javac -version
These should display the oracle version installed - 1.6.0_45


Installing Apache Hadoop on Ubuntu


1. Installing Sun JDK 1.6: Installing JDK is a required step to install Hadoop. You can follow the steps in my previous post.

2. Adding a dedicated Hadoop system user: You will need a user for hadoop system you will install. To create a new user "hduser" in a group called "hadoop", run the following commands in your terminal:

$sudo addgroup hadoop
$sudo adduser --ingroup hadoop hduser

3.Configuring SSH: in Michael Blog, he assumed that the SSH is already installed. But if you didn't install SSH server before, you can run the following command in your terminal: By this command, you will have installed ssh server on your machine, the port is 22 by default.

 $sudo apt-get install openssh-server

We have installed SSH because Hadoop requires access to localhost (in case single node cluster) or    communicates with remote nodes (in case multi-node cluster).
After this step, you will need to generate SSH key for hduser (and the users you need to administer Hadoop if any) by running the following commands, but you need first to switch to hduser:

$su - hduser
$ssh-keygen -t rsa -P ""

To be sure that SSH installation is went well, you can open a new terminal and try to create ssh session using hduser by the following command:

$ssh localhost

Adding hduser to the sudoers list


udo usermod -aG sudo hduser
The a is very important. Without it they'll be removed from all other groups. You will need to either restart your shell/terminal or log out and back in for this to take effect.


4. Disable IPv6: You will need to disable IP version 6 because Ubuntu is using 0.0.0.0 IP for different Hadoop configurations. You will need to run the following commands using a root account:
$sudo gedit /etc/sysctl.conf
This command will open sysctl.conf in text editor, you can copy the following lines at the end of the file:

#disable ipv6
net.ipv6.conf.all.disable_ipv6 = 1
net.ipv6.conf.default.disable_ipv6 = 1
net.ipv6.conf.lo.disable_ipv6 = 1

Disable IP V6


You can save the file and close it. If you faced a problem telling you don't have permissions, just remember to run the previous commands by your root account.

 These steps required you to reboot your system, but alternatively, you can run the following command to re-initialize the configurations again.

$sudo sysctl -p 

To make sure that IPV6 is disabled, you can run the following command:

$cat /proc/sys/net/ipv6/conf/all/disable_ipv6

The printed value should be 1, which means that is disabled.


Installing Hadoop


Now we can download Hadoop to begin installation. Go to Apache Downloads and download Hadoop version 0.20.2. To overcome the security issues, you can download the tar file in hduser directory, for example, /home/hduser. Check the following snapshot:

Download Hadoop

Then you need to extract the tar file and rename the extracted folder to 'hadoop'. Open a new terminal and run the following command:

$ cd /home/hduser
$ sudo tar xzf hadoop-0.20.2.tar.gz
$ sudo mv hadoop-0.20.2 hadoop

Please note if you want to grant access for another hadoop admin user (e.g. hduser2), you have to grant read permission to folder /home/hduser using the following command:

sudo chown -R hduser:hadoop hadoop


Update $HOME/.bashrc


You will need to update the .bachrc for hduser (and for every user you need to administer Hadoop). To open .bachrc file, you will need to open it as root:

$sudo gedit /home/hduser/.bashrc

Then you will add the following configurations at the end of .bachrc file


# Set Hadoop-related environment variables

export HADOOP_HOME=/home/hduser/hadoop


# Set JAVA_HOME (we will also configure JAVA_HOME directly for Hadoop later on)

export JAVA_HOME=/usr/lib/jvm/java-6-oracle


# Some convenient aliases and functions for running Hadoop-related commands

unalias fs &> /dev/null

alias fs="hadoop fs"

unalias hls &> /dev/null

alias hls="fs -ls"


# If you have LZO compression enabled in your Hadoop cluster and

# compress job outputs with LZOP (not covered in this tutorial):

# Conveniently inspect an LZOP compressed file from the command

# line; run via:
#
# $ lzohead /hdfs/path/to/lzop/compressed/file.lzo
#
# Requires installed 'lzop' command.
#
lzohead () {
    hadoop fs -cat $1 | lzop -dc | head -1000 | less
}

# Add Hadoop bin/ directory to PATH
export PATH=$PATH:$HADOOP_HOME/bin

Hadoop Configuration


Now, we need to configure Hadoop framework on Ubuntu machine. The following are configuration files we can use to do the proper configuration. To know more about hadoop configurations, you can visit this site

hadoop-env.sh


We need only to update the JAVA_HOME variable in this file. Simply you will open this file using a text editor using the following command:

$sudo gedit /home/hduser/hadoop/conf/hadoop-env.sh

Then you will need to change the following line

# export JAVA_HOME=/usr/lib/j2sdk1.5-sun

To 

export JAVA_HOME=/usr/lib/jvm/java-6-sun

Note: if you faced "Error: JAVA_HOME is not set" Error while starting the services, then you seems that you forgot toe uncomment the previous line (just remove #).


core-site.xml

First, we need to create a temp directory for Hadoop framework. If you need this environment for testing or a quick prototype (e.g. develop simple hadoop programs for your personal test ...), I suggest to create this folder under /home/hduser/ directory, otherwise, you should create this folder in a shared place under shared folder (like /usr/local ...) but you may face some security issues. But to overcome the exceptions that may caused by security (like java.io.IOException), I have created the tmp folder under hduser space.

To create this folder, type the following command:

$ sudo mkdir  /home/hduser/tmp

Please note that if you want to make another admin user (e.g. hduser2 in hadoop group), you should grant him a read and write permission on this folder using the following commands:


$ sudo chown hduser:hadoop /home/hduser/tmp

$ sudo chmod 755 /home/hduser/tmp
Now, we can open hadoop/conf/core-site.xml to edit the hadoop.tmp.dir entry.
We can open the core-site.xml using text editor:

$sudo gedit /home/hduser/hadoop/conf/core-site.xml

Then add the following configurations between <configuration> .. </configuration> xml elements:

<!-- In: conf/core-site.xml -->
<property>
  <name>hadoop.tmp.dir</name>
  <value>/home/hduser/tmp</value>
  <description>A base for other temporary directories.</description>
</property>

<property>
  <name>fs.default.name</name>
  <value>hdfs://localhost:54310</value>
  <description>The name of the default file system.  A URI whose
  scheme and authority determine the FileSystem implementation.  The
  uri's scheme determines the config property (fs.SCHEME.impl) naming
  the FileSystem implementation class.  The uri's authority is used to
  determine the host, port, etc. for a filesystem.</description>
</property>


mapred-site.xml

We will open the hadoop/conf/mapred-site.xml using a text editor and add the following configuration values (like core-site.xml)
$sudo gedit /home/hduser/hadoop/conf/mapred-site.xml

<!-- In: conf/mapred-site.xml -->
<property>
  <name>mapred.job.tracker</name>
  <value>localhost:54311</value>
  <description>The host and port that the MapReduce job tracker runs
  at.  If "local", then jobs are run in-process as a single map
  and reduce task.
  </description>
</property>


hdfs-site.xml

Open hadoop/conf/hdfs-site.xml using a text editor and add the following configurations:

$sudo gedit /home/hduser/hadoop/conf/hdfs-site.xml

<!-- In: conf/hdfs-site.xml -->
<property>
  <name>dfs.replication</name>
  <value>1</value>
  <description>Default block replication.
  The actual number of replications can be specified when the file is created.
  The default is used if replication is not specified in create time.
  </description>
</property>


Formatting NameNode


You should format the NameNode in your HDFS. You should not do this step when the system is running. It is usually done once at first time of your installation.
Run the following command

$/home/hduser/hadoop/bin/hadoop namenode -format
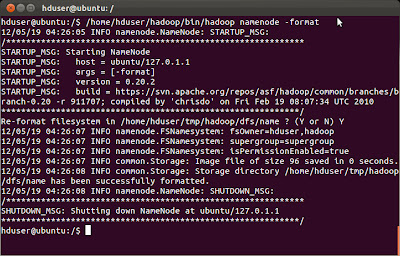
Formatting Namenode (HDFS)
NameNode Formatting


Starting Hadoop Cluster


You will need to navigate to hadoop/bin directory and run ./start-all.sh script.
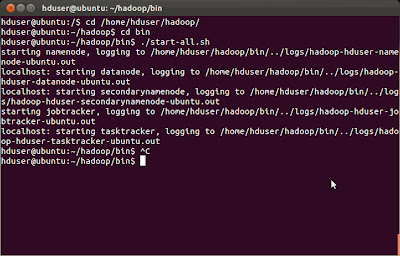
Starting Hadoop Services ./start-all.sh
Starting Hadoop Services using ./start-all.sh

There is a nice tool called jps. You can use it to ensure that all the services are up.
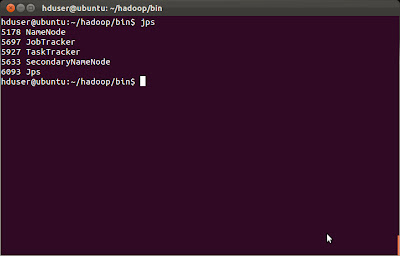
jps tool
Using jps tool

Running an Example (Pi Example)
There are many built-in examples. We can run PI estimator example using the following command:

hduser@ubuntu:~/hadoop/bin$ hadoop jar ../hadoop-0.20.2-examples.jar pi 3 10

If you faced "Incompatible namespaceIDs" Exception you can do the following:

1.  Stop all the services (by calling ./stop-all.sh).
2.  Delete /tmp/hadoop/dfs/data/*
3.  Start all the services.


Recently found this link...


http://www.michael-noll.com/tutorials/running-hadoop-on-ubuntu-linux-single-node-cluster/#!